打开微信,使用扫一扫进入页面后,点击右上角菜单,
点击“发送给朋友”或“分享到朋友圈”完成分享
备注:以下经验总结适用于MLU100系列参数及相关软件栈说明,MLU200系列均已修复支持。
其中caffe、darnket框架pad补齐方式部分可作为经验学习。
总结
**科技提供demo.py运行程序以及yolov3-ud.cfg(yolov3-tiny)和snapshot.ckpt模型参数文件。其中,snapshot.ckpt中内容(权值)以torch.tensor格式存储。为使算法最终能在MLU上运行,需对yolov3-ud.cfg和snapshot.ckpt进行格式转换,流程如下:
yolov3-ud.cfg ① yolov3-ud.cfg ② yolov3-ud.prototxt ③
snapshot.ckpt -------> snapshot.weights ------->snapshot.caffemodel -------> yolov3.cambricon
①. 客户将自己训练好的参数模型文件用pytorch保存为.ckpt类型。而darknet下通常将yolo模型文件以.cfg和.weights文件形式进行存储。因此首先需将.ckpt模型转为.weights。
填坑1:
首先介绍.weights相关信息:
.weights以二进制流的形式存储各层权值。
./darknet->src->parser.c 有关.weights存储方式说明:
FILE *fp = fopen(filename, "wb");
if(!fp) file_error(filename);
int major = 0;
int minor = 2;
int revision = 0;
fwrite(&major, sizeof(int), 1, fp);
fwrite(&minor, sizeof(int), 1, fp);
fwrite(&revision, sizeof(int), 1, fp);
fwrite(net->seen, sizeof(size_t), 1, fp);
对.weights文件前int(4字节)*3+size_t(32位-->4字节,64位8字节)=20字节定义,将相关头文件信息写入。
备注:size_t在32位架构上是4字节,在64位架构上是8字节,在不同架构上进行编译时需要注意这个问题。而int在不同架构下都是4字节,与size_t不同;且int为带符号数,size_t为无符号数。
其余数据,卷积层参数等以float类型(4bytes)存入,对于BN层,存入顺序为(该点很重要):
int num = l.nweights;
fwrite(l.biases, sizeof(float), l.n, fp);
if (l.batch_normalize){
fwrite(l.scales, sizeof(float), l.n, fp);
fwrite(l.rolling_mean, sizeof(float), l.n, fp);
fwrite(l.rolling_variance, sizeof(float), l.n, fp);
}
fwrite(l.weights, sizeof(float), num, fp);
1. l.biases 2. l.scales 3. l.rolling_mean 4. l.rolling_variance 5. l.weights
其次,对于.ckpt文件,首先需要用:
load_state_dict(torch.load('snapshot2.ckpt', map_location='cpu'))读取,然后将读取信息写入,最终保存为.weights文件,(读取的ckpt文件,不包含头文件信息,需要手动写入)代码如下:
filename = 'yolo-pytorch2darknet.weights'
fp = open(filename, 'wb')
header = torch.IntTensor([0,2,0,0])
header.numpy().tofile(fp)
for k,v in model.model.state_dict().items():
      v.numpy().tofile(fp)
       #print(k,v.shape)
     # print(v.numpy())
    fp.close()
注:新生成的.weights文件,其中权值存储顺序同.ckpt文件一致。
**所提供代码在********/yolov3/nets/darknet.py文件中,通过里面定义的load_weights函数支持对.weights文件类型读取,但读取生成.weights则会出错,原因是客户所提供.ckpt文件BN层权值存储顺序与darknet官方并不一致(而他们的load_weights函数读取顺序确又跟darknet相同)。如下图所示:
ckpt->weights darknet2caffe
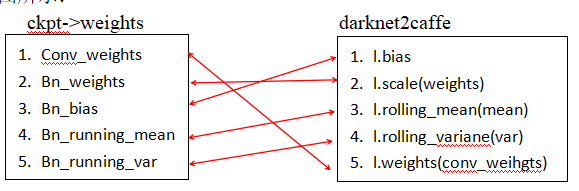
因此,对于load_weights函数需要将其对.weights文件BN层读取顺序进行调整。
注:无论是load_weights函数还是darknet2caffe(将.weights转为caffemodel)工具,对二进制流文件.weights读取、保存都是按照“下标+size”方式进行读存。例如:
      bn_weights = torch.from_numpy(weights[ptr: ptr + num_bn_weights])
      ptr += num_bn_weights
      bn_biases = torch.from_numpy(weights[ptr:ptr + num_bn_biases])
      ptr += num_bn_biases
填坑2: 由.ckpt转weights过程中,ckpt文件在每个BN层后会多出一层num_batches_tracked:
module_list.0.conv_0.weight torch.Size([16, 3, 3, 3])
module_list.0.batch_norm_0.bias torch.Size([16])
module_list.0.batch_norm_0.running_mean torch.Size([16])
module_list.0.batch_norm_0.running_var torch.Size([16])
module_list.0.batch_norm_0.num_batches_tracked torch.Size([])
该层size为空,但通过函数load_weights读取或darknet2caffe模型转换时,该层经过二进制存储转换,读取时会多出两个0,即running_var与下一层conv_weight之间会多出两个0值。
所以load_weights函数以及 darknet2caffe工具,BN层读取存储之后,需要手动添加ptr+=2,跳过两个0值的录入;
通过以上步骤和修改,可以将ckpt转化为weights文件,并使用**所给demo成功运行;
②. 由于**提供模型参数文件ckpt(weights)特殊性,无法直接用darknet2caffe-yolov3.py工具脚本对.weights文件进行.caffemodel转换。需要对darknet2caffe-yolov3.py进行改进,更改BN层读取顺序以及BN层后ptr+=2,才可生成正常.caffemodel模型prototxt;
填坑3:
在**所给模型yolov3-ud.cfg文件中,最后一个maxpool层参数为size=2,stride=1,通过上述darknet2caffe-yolov3.py将.cfg转成prototxt时,默认转出相对应的maxpool层参数为kernel_size:1,stride:1,pool=MAX。
因此,这里首先将生成的prototxt文件,手动改为kernel_size:2,stride=1 。此外,还需加上pad_h:1,pad_w:1,具体原因后续解释;

upsample层需将:
改为:
type: "Upsample"
type: "Interp"
upsample_param
{scale: 2}
interp_param{
height: 26
width: 26
}
③. 经过上述步骤生成(以及修改)的.prototxt和.caffemodel文件,通过genoff 工具可生成.cambricon离线模型,但在运行之前需要进行如下修改:
cd ****/caffe/src/caffe/src/caffe/layers/
vim mlu_pooling_layer.cpp
对源代码61行开始:
源码:
61   if (this->ceil_mode_) {
 62     this->pooled_height_ = static_cast<int>(ceil(static_cast<float>(
 63             this->height_ + 2 * this->pad_h_ - this->kernel_h_) /
 64           this->stride_h_)) + 1;
 65     this->pooled_width_ = static_cast<int>(ceil(static_cast<float>(
 66             this->width_ + 2 * this->pad_w_ - this->kernel_w_) /
 67           this->stride_w_)) + 1;
 68   } else {
 69     this->pooled_height_ = static_cast<int>(floor(static_cast<float>(
 70             this->height_ + 2 * this->pad_h_ - this->kernel_h_) /
 71           this->stride_h_)) + 1;
 72     this->pooled_width_ = static_cast<int>(floor(static_cast<float>(
 73             this->width_ + 2 * this->pad_w_ - this->kernel_w_) /
 74           this->stride_w_)) + 1;
 75   }
修改为:
    if (this->ceil_mode_) {
       if(this->kernel_h_==2 && this->stride_w_ == 1){
         this->pooled_height_ = static_cast<int>(ceil(static_cast<float>(
              this->height_ + 1* this->pad_h_ - this->kernel_h_) /
            this->stride_h_)) + 1;
         this->pooled_width_ = static_cast<int>(ceil(static_cast<float>(
              this->width_ + 1* this->pad_w_ - this->kernel_w_) /
            this->stride_w_)) + 1;
      }
      else{
         this->pooled_height_ = static_cast<int>(ceil(static_cast<float>(
              this->height_ + 2 * this->pad_h_ - this->kernel_h_) /
            this->stride_h_)) + 1;
         this->pooled_width_ = static_cast<int>(ceil(static_cast<float>(
              this->width_ + 2 * this->pad_w_ - this->kernel_w_) /
            this->stride_w_)) + 1;
      }
     } else {
      this->pooled_height_ = static_cast<int>(floor(static_cast<float>(
              this->height_ + 2 * this->pad_h_ - this->kernel_h_) /
            this->stride_h_)) + 1;
      this->pooled_width_ = static_cast<int>(floor(static_cast<float>(
              this->width_ + 2 * this->pad_w_ - this->kernel_w_) /
            this->stride_w_)) + 1;
}
修改原因为:
对于maxpool层的输出大小计算,首先,darknet官方在文件darknet/src/maxpool_layer.c中定义为:
l.out_w = (w + padding - size)/stride + 1;
l.out_h = (h + padding - size)/stride + 1;
其次,客户所给代码,源码中有个判断,当maxpool层的kernel_size=2,stride=1时,会做一个nn.ZeroPad2d((0, 1, 0, 1))。意思是在特征图右侧和下侧进行pad补齐。计算公式同darknet官方相同,都是padding*1补齐特征图右侧和下侧。
在caffe-> s->pooling_ .cpp(CPU)以及mlu_pooling_ .cpp定义中,caffe默认maxpool的输出计算公式如下所示:
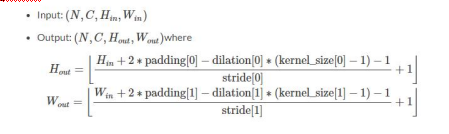
其中,当Hin=13, pad = 1, dilation=1(默认为1),kernel_size=2, stride=1时,根据上述公式可得Hout=14,原因是caffe下默认padding*2,而darknet以及客户所给模型中padding*1补齐,所得结果扔为Hout=13。
因此上述代码增加对特殊情况(kernel_size=2,stride=1)判断,使其输出size保持不变。
注:在prototxt文件maxpool层中,若不设置pad参数,则默认为0,这里设置pad_h:1 pad_w:1。
填坑4:
若通过上述修改,在使用genoff工具生成离线模型时,maxpool层后特征图输出大小仍为13*13保持不变,但随后会运行报错:

错误原因最终在mlu_pooling_ .cpp定位于:

即当保持输出size大小不变后,代码会创建相应的算子进行检查,在上述函数创建过程中,由于我们设置pad_h=1和pad_w=1,caffe是将padding作为单独一个tensor加入到特征图中。
现在先回到上页caffe中maxpool输出计算公式上。由于计算公式中pading*2,因此caffe下是在特征图四周(上下左右)进行pad补齐。而我们增加了kernel_size=2,stride=1的特殊情况判断,使得pad*1。
因此需要对mlu_pooling_layer.cpp源码中当pad_h_=1和pad_w_=1时,addpad_shape进行修改,将源码中上下左右补齐方式改为只补齐一半。
104行源码:
104   if (this->pad_h_ || this->pad_w_) {
105     vector<int> addpad_shape = bottom[0]->shape();
106     addpad_shape[2] = bottom[0]->height() + this->pad_h_ + pad_down_;
107     addpad_shape[3] = bottom[0]->width() + this->pad_w_ + pad_right_;
108    addpad_.Reshape(addpad_shape, cpu_dtype, mlu_dtype, CNML_TENSOR);
109   }
这里 bottom[0]->height() =13 , this->pad_h_ = 1, pad_down_=1,
因此 addpad_shape[2] =15, 所以最终会报错;
修改为:
if (this->pad_h_ || this->pad_w_) {
   vector<int> addpad_shape = bottom[0]->shape();
   addpad_shape[2] = bottom[0]->height() + this->pad_h_;
   addpad_shape[3] = bottom[0]->width() + this->pad_w_;
   addpad_.Reshape(addpad_shape, cpu_dtype, mlu_dtype, CNML_TENSOR);
}通过上步修改,使得pad只对宽和高一侧进行补齐。此时在通过genoff工具可顺利生成.cambrion离线模型。
填坑5:
上述步骤生成的.cambrion离线模型在使用程序调用离线模型时,会使得最终结果,即检测结果出现偏差,如下图所示:

通过对比maxpool层前后各种参数、权值,得到结论如下:
由于caffe下默认padding*2为四周补齐方式,现经过我们手动调整,只补齐一边padding*1,因此caffe下默认将原特征图上侧和左侧补齐。而实际我们需要将右侧和下侧补齐。
对此,可参考手册Cambricon-CNML-API-Guide-EN-v1.0.0.pdf(英文版)对函数cnmlCreateAddPadOp4Param的定义和参数说明:

对源码117行进行如下修改:
117行源码:
  117 if (this->pad_h_ || this->pad_w_) {
  118     MLU_CHECK(cnmlCreateAddPadOp4Param(&pool_addpad_op_param_,
  119          this->pad_h_,
  120          pad_down_,
  121          this->pad_w_,
  122          pad_right_,
  123          0));
修改为:
 if (this->pad_h_ || this->pad_w_) {
        MLU_CHECK(cnmlCreateAddPadOp4Param(&pool_addpad_op_param_,
0,1,0,1,-10000.0));由于源码中cnmlCreateAddPadOp4Param函数最后一个参数默认为0,而进行maxpool的特征图中参数存在为负数情况,经过maxpool后会得到很多0的情况,这里改为-10000,使得得到结果仍为原特征图中最大值。
以上对mlu_pooling_layer.cpp的修改,在重新build之后所生成的离线模型可顺利运行并与客户所提供的demo.py检测结果一致。
热门帖子
精华帖子


 Ashelly
13 回复
Ashelly
13 回复
 三叶虫
6 回复
三叶虫
6 回复
 fengyunkai
1 回复
fengyunkai
1 回复


 goodchong
 jyjyjyjyjy
 Github
 开发平台
开发平台 文档中心
文档中心 新手必读
新手必读