打开微信,使用扫一扫进入页面后,点击右上角菜单,
点击“发送给朋友”或“分享到朋友圈”完成分享
知乎链接:【CN-MM2】MagicMind 模型生成(框架解析)
https://zhuanlan.zhihu.com/p/594256690
本文讲解 MagicMind 是如何具体实现框架解析的,在这里面该遵循什么样的流程,具体使用到什么样的 api,解析各个不同的开源框架有什么样的不同之处。最后介绍 MagicMind 将开源框架模型解析并转换为 MagicMind 模型的一个简单的工具。
MagicMind 首先会将诸如 TensorFlow,PyTorch 一类的开源框架的模型的解析为 network,然后通过builder 去优化和生成模型,当我们得到了 MagicMind 模型之后可以选择将其序列化保存为模型文件,供以后使用;或者选择直接将模型进行部署


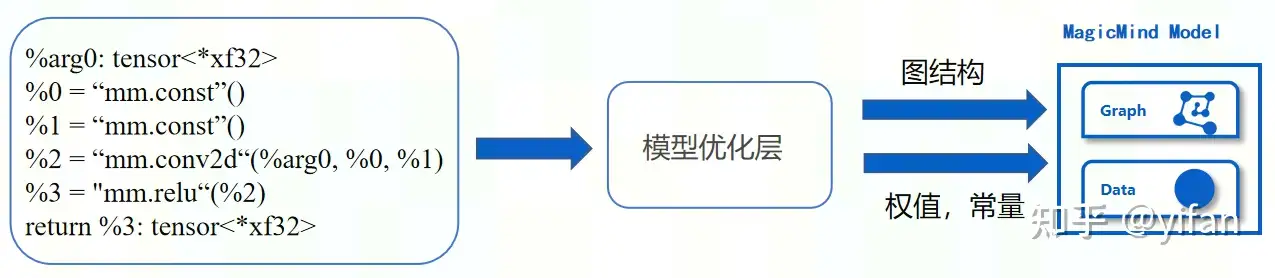
MagicMind 基于 MLIR 定义了自己的中间表示,比如 TensorFlow的frozen pb,PyTorch trace出来的pt模型。这些是由一些基础运算组成的,包含了卷积,激活等算子,通过 Parser 可以将这些算子映射到MagicMind 的计算图中,如 mm.conv2d,mm.relu. 这一部分我们称其为 MagicMind 中间图表示,MMIR(MagicMind Intermediate Representation)。用户训练好的算法模型会统一转换为 MagicMind IR 表示的计算图,后续的模型优化和代码生成都基于该计算图完成)
说明:MLIR 中文含义是多级的中间表示,这是由 LLVM 团队开发和维护的一套编译器基础设施,它强调工具链的可重用性和可扩展性。
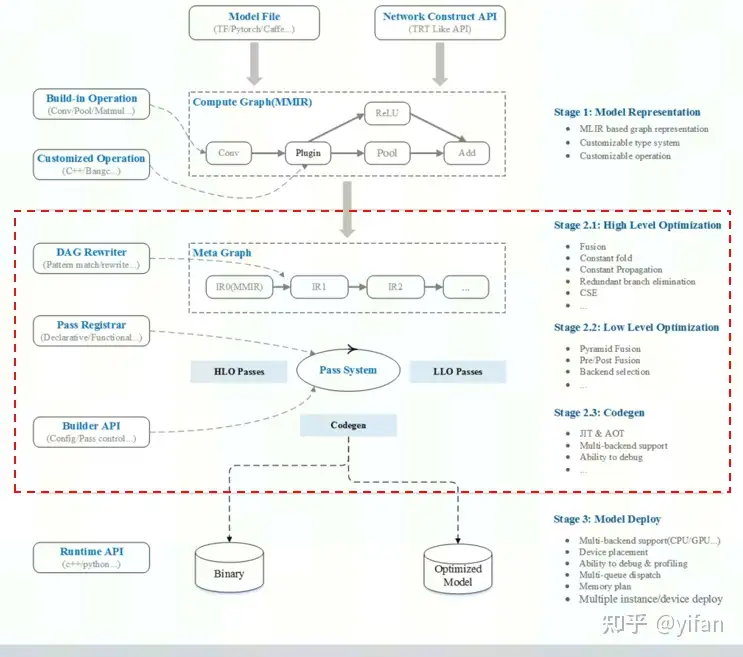
MagicMind 模型优化层,该层主要包含计算图高级别优化、计算图低级别优化和代码生成三部分:
计算图高级别优化(HLO)的工作是完成与硬件无关的、算法层级的优化,包括但不限于算子融合、常量折叠、冗余分支消除等。
计算图低级别优化(LLO)主要是完成硬件相关的优化,包括但不限于物理布局转换、前后融合等。
代码生成部分是完成指令和模型对象生成。该部分支持自动代码生成和手写算子库匹配两种代码生成方式,最终将指令和权重数据打包,生成模型对象(可序列化到文件)。
在将开源框架模型解析为 MagicMind IR 表示的计算图后,MagicMind 会对该计算图进行优化和代码生成。
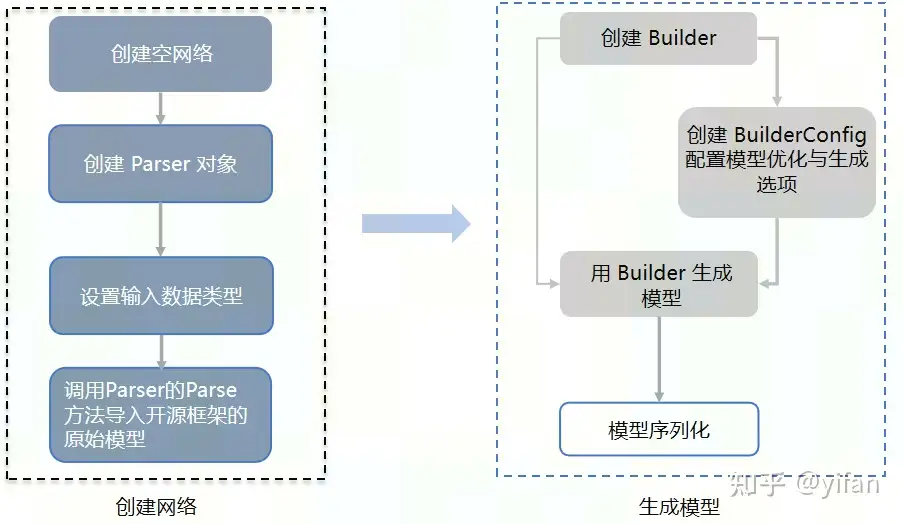
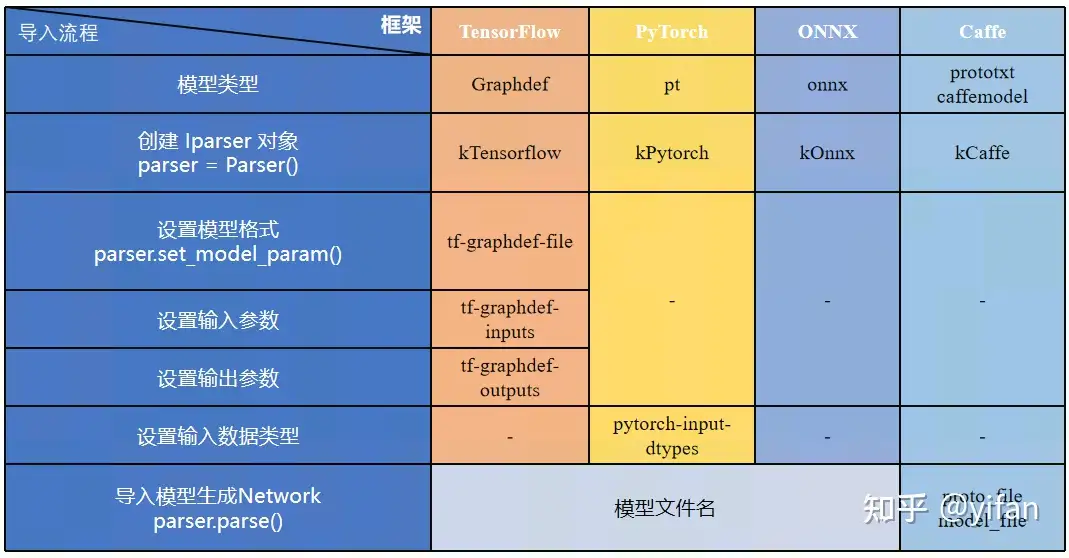
主要流程如上图所示,其中说明两点:
不同的框架会有不同的设置。设置完数据类型后需要调用 Parser 的 parse 方法导入开源框架的原始模型,比如 PyTorch 的 pt 模型。
创建 builder 之后,可以选择是否需要需要创建 builderconfig 来配置模型生成选项,当不创建builderconfig 时,MagicMind 会使用默认参数生成模型,当选择创建 builderconfig 时,我们可以自己配置一些包括模型的设备选择,模型的优化等的参数
大概了解模型解析的流程之后,我们需要首先了解 MagicMind Parser 支持的模型格式。
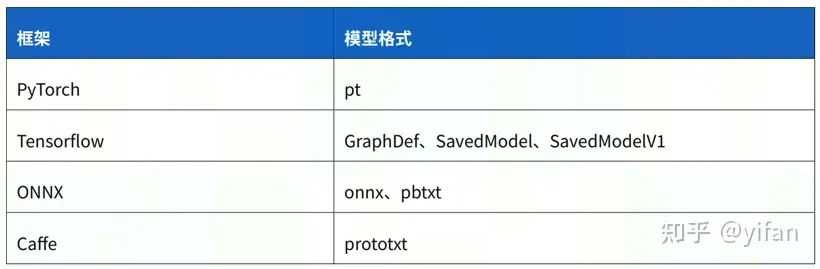
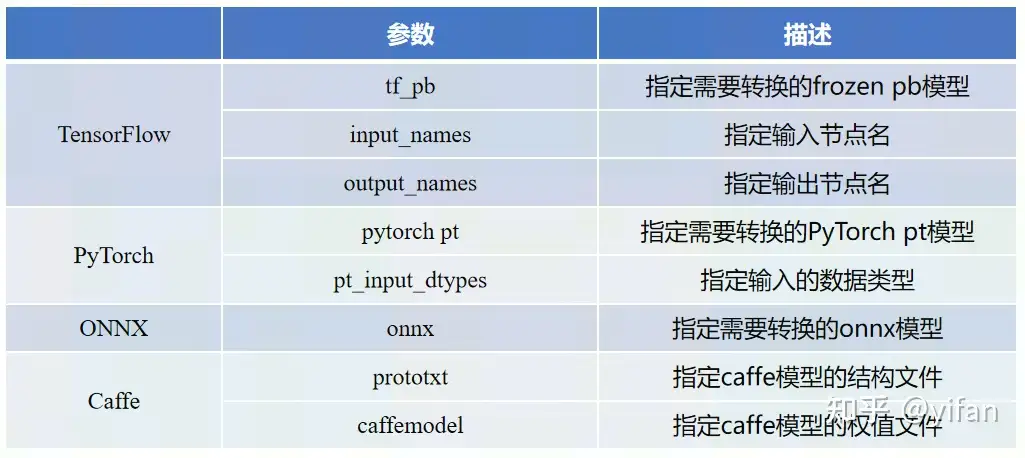
支持以上4种形式,其他两个如下:
对于PyTorch 框架 MagicMind 支持 jit trace 模式生成的模型,该模型一般会以 .pt 作为后缀。
TensorFlow 目前有两个版本,分别是 TensorFlow1 和 TensorFlow2,MagicMind Parser 支持对TensorFlow1 的 graphdef 也就是 frozen pb 格式的模型和 saved model 格式的模型进行解析,支持对 TensorFlow2 的 saved model 格式模型进行解析。
MagicMind 的 PyTorch Parser 目前只支持解析 pt 格式(用JIT 模式生成)的 PyTorch 模型的示例:
input = torch.randn(1, 3, 224, 224)trace_model = torch.jit.trace(model, input)torch.jit.save(trace_model, "resnet50.pt")
配置 config 文件的两种方式:
1)通过json文件配置config
# 通过json文件配置configIBuilderConfig* config = CreateIBuilderConfig();config->ParseFromFile("user_config_path/build_config.json");{
    "opt_config": {
    "conv_scale_fold": true
    },}
2)通过字符串配置
# 通过字符串配置IBuilderConfig* config = CreateIBuilderConfig();std::string user_json_string = "xxx";config->ParseFromString(user_json_string);
其中的常见参数:
config 里的常用参数设置:

基本设置:
archs
graph_shape_mutable
computation_preference
优化设置:
type64to32_conversion
conv_scale_fold
精度设置:
precision_mode
pt_model = "sample.pt" builder = mm.Builder()sample_network = mm.Network()# 创建parserparser = Parser(mm.ModelKind.kPytorch)# 模型输入类型设置parser.set_model_param("pytorch-input-dtypes", [DataType.FLOAT32])# 解析PyTorch模型parser.parse(sample_network, pt_model)# 创建BuilderConfigconfig = BuilderConfig()# parse config文件config.parse_from_file("graph_dump.json")# 生成模型model = builder.build_model("sample_model", sample_network, config)offline_model_name = "sample_parse.mm"# 模型序列化model.serialize_to_file(offline_model_name)工具名称:mm_build
工具用途:解析开源框架模型并生成对应的 MagicMind 模型
工具位置:MagicMind 软件栈 /usr/local/neuware/samples/magicmind/mm_build/
使用步骤:
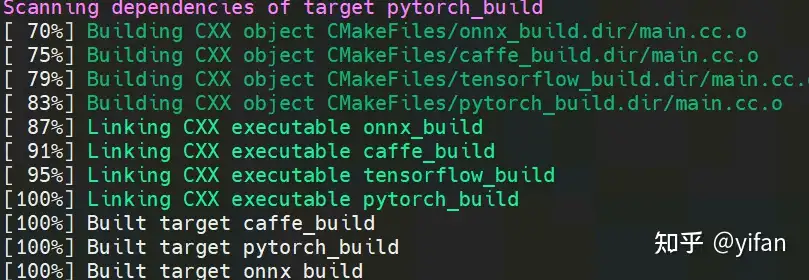
1、进入到工具位置参照 readme 编译 tensorflow_build, pytorch_build, onnx_build, caffe_build 四个二进制文件
2、执行所需转换的模型对应的二进制文件,对模型进行转换
参数介绍:
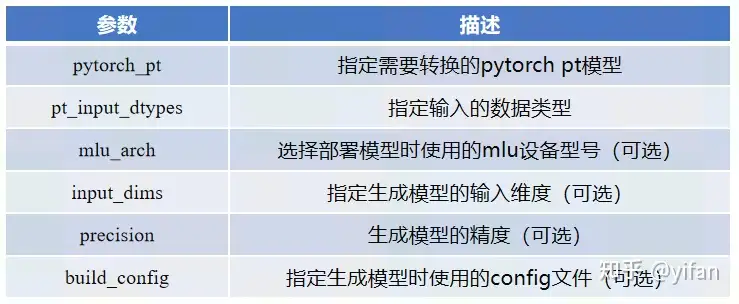
build命令及参数解释pytorch_build                               \       –pytorch_pt model.pt            \       –pt_input_dtypes FLOAT           \       –mlu_arch mtp_372              \       –input_dims 1,3,224,224      \
       –precision force_float32       \       –build_config config.json
具体的更多参数细节:
Options:--precision<Str>[optional]:
        Allowed: force_float32/force_float16/qint16_mixed_float16/qint8_mixed_float16/qint16_mixed_float32/qint8_mixed_float32
        Mix precision mode.--calibration<Bool>[optional]:
        Allowed: 0/1/true/false(ignore capsules)
        Default: false
        To do calibration or not. Will use range [-1,1] and skip calibration if no file or range is set.--rpc_server<Str>[optional]:
        Set remote address for calibration.--calibration_algo<Str>[optional]:
        Allowed: linear/eqnm
        Default: linear
        Set quantization algorithm for calibration.--file_list<Vec<Str>>[optional]:
        Input file list path by order. For calibration only. MUST input with calibration_data_path.--calibration_data_path<Str>[optional]:
        Directory for calibration data. MUST input with file_list.--random_calib_range<Vec<Float>>[optional]:
        Set random range for calibration. Will override path and filelist.--batch_size<Vec<Int>>[optional]:
        Input batchsize by order, will override all highest dimensions for all inputs and not affect unrank/scalar inputs.--input_dims<Vec<Vec<Int>>>[optional]:
        Use '_' as empty vector;
        Input shapes by order. '_' represents scalar.--input_layout<Vec<Str>>[optional]:
        Allowed: NCHW/NHWC/NCT/NTC/NCDHW/NDHWC
        Convert input layouts from channel last to channel second (or the opposite) by order.--input_dtypes<Vec<Str>>[optional]:
        Allowed: INT8/INT16/INT32/UINT8/UINT16/UINT32/HALF/FLOAT/BOOL/QINT8/QINT16
        Input data types by order for inference (will not affect calibration).--dynamic_shape<Bool>[optional]:
        Allowed: 0/1/true/false(ignore capsules)
        Default: true
        To compile with dynamic shape or not.--vars<Vec<Vec<Float>>>[optional]:
        Use '_' as empty vector;
        Vars for inputs by order. MUST input with means.--means<Vec<Vec<Float>>>[optional]:
        Use '_' as empty vector;
        Means for inputs by order. MUST input with vars.--output_layout<Vec<Str>>[optional]:
        Allowed: NCHW/NHWC/NCT/NTC/NCDHW/NDHWC
        Convert output layouts from channel last to channel second (or the opposite) by order.--output_dtypes<Vec<Str>>[optional]:
        Allowed: INT8/INT16/INT32/UINT8/UINT16/UINT32/HALF/FLOAT/BOOL/QINT8/QINT16
        Output data types by order.--mlu_arch<Vec<Str>>[optional]:
        Allowed: mtp_220/mtp_270/mtp_290/mtp_372/tp_322
        Target arch for mlu dev. Unset means all.--plugin<Vec<Str>>[optional]:
        Plugin library paths to   with.--magicmind_model<Str>[optional]:
        Default: ./model
        File path for output serialization model file.--build_config<Str>[optional]:
        Additional json build config for build. Config json will override other arg params.--toolchain_path<Str>[optional]:
        Default: /usr/local/gcc-linaro-6.2.1-2016.11-x86_64_aarch64-linux-gnu/
        Cross compile toolchain path for tp_322 and mtp_220.--rgb2bgr<Bool>[optional]:
        Allowed: 0/1/true/false(ignore capsules)
        Default: false
        convert RGB to BGR for first  's Conv/BatchNorm/Scale of network--pytorch_pt<Str>[required]:
        PyTorch pt file path for PyTorch parser.--pt_input_dtypes<Vec<Str>>[optional]:
        Allowed: INT8/INT16/INT32/UINT8/UINT16/UINT32/HALF/FLOAT/BOOL/QINT8/QINT16
        Default: FLOAT
        Input data types by order for parsing PyTorch pt.
其他模型的参数选择:
使用官网下载的pytorch模型,并进行转行,运行如下:
# 1) 下载模型:wget https://download.pytorch.org/models/resnet50-19c8e357.pth# 2) 运行,先转换成对应的 pt 文件python convert_pt.py# 生成 MM 文件python pt_to_mm.py
其中:
convert_pt.py
import torchimport torchvisionmodel = torchvision.models.resnet50()model.load_state_dict(torch.load("./resnet50-19c8e357.pth"))model.eval() # 使用trace之前,一定要执行model.eval(),以保证trace测试而不是训练的逻辑input = torch.randn(1, 3, 224, 224)trace_model = torch.jit.trace(model, input)torch.jit.save(trace_model, "resnet50_mm.pt")pt_to_mm.py
import jsonimport torchimport numpy as npimport osimport magicmind.python.runtime as mmfrom magicmind.python.runtime.parser import Parserbatch_size = 1# 创建 Builderbuilder = mm.Builder()# 创建 MagicMind Networkresnet50_network = mm.Network()# 创建 MagicMind builder_configbuilder_config = mm.BuilderConfig()# 创建 MagicMind Parser (pytorch后端)parser = Parser(mm.ModelKind.kPytorch)# 获取 Network 的输入节点及其维度parser.set_model_param("pytorch-input-dtypes", [mm.DataType.FLOAT32])# 将 resnet50_mm.pt 与 MagicMind Network 绑定parser.parse(resnet50_network, "./resnet50_mm.pt")# 设置 MagicMind Network 参数:硬件平台、自动int64转int32、卷积折叠,可变输入开关等build_config = {
        "archs": ["mtp_372"],
        "graph_shape_mutable": True,
        "precision_config": {"precision_mode": "force_float32"},
"opt_config": {"type64to32_conversion": True, "conv_scale_fold": True}}builder_config.parse_from_string(json.dumps(build_config)).ok()# 执行 MagicMind 模型生成model = builder.build_model("resnet50_parser.mm", resnet50_network, builder_config)# 保存 MagicMind 模型至本地assert model != Nonemodel.serialize_to_file("./resnet50_parser.mm")print("Generate model done, model save to %s" % "./resnet50_parser.mm")首先需要确认在/usr/local/neuware/samples/magicmind/mm_build下是否有编译好的可执行文件,若是没有,请先执行以下脚本:
make_build_tool.sh 脚本如下:
#!/bin/bashif [[ ! -f "/usr/local/neuware/samples/magicmind/mm_build/build/caffe_build" ]]; thenpushd /usr/local/neuware/samples/magicmind/mm_buildmkdir build cd buildcmake -DABI=0 ..make -j32popdelse
  echo "caffe_build exist !"fi
运行以下:
bash make_build_tool.sh
将会编译生成对应的工具如下:
运行以下脚本:
/usr/local/neuware/samples/magicmind/mm_build/build/pytorch_build \--pytorch_pt ./resnet50_mm.pt \--pt_input_dtypes FLOAT \--mlu_arch mtp_372 \--magicmind_model ./resnet50_from_mm_build.mm
最终生成:
SyntaxHighlighter.all();
热门帖子
精华帖子


 Ashelly
13 回复
Ashelly
13 回复
 三叶虫
6 回复
三叶虫
6 回复
 fengyunkai
1 回复
fengyunkai
1 回复


 goodchong
 jyjyjyjyjy
 Github
 开发平台
开发平台 文档中心
文档中心 新手必读
新手必读