打开微信,使用扫一扫进入页面后,点击右上角菜单,
点击“发送给朋友”或“分享到朋友圈”完成分享
知乎链接:https://zhuanlan.zhihu.com/p/594257498
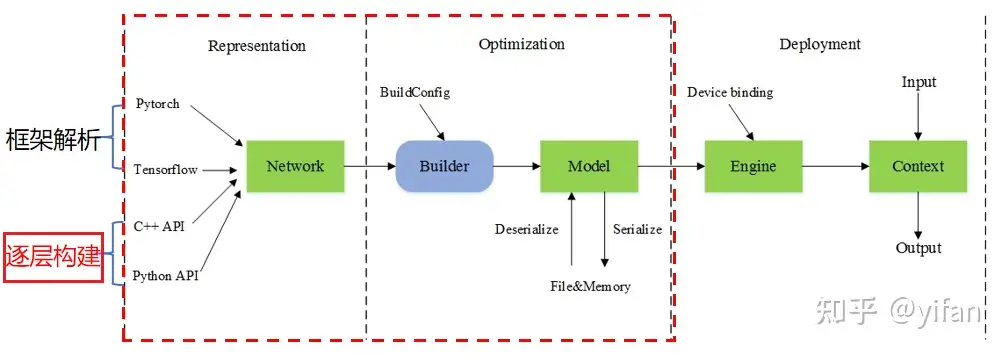
框架移植:自定义框架可以调用 MagicMind API 进行模型推理
使用自定义算子
修改 MagicMind 模型:优化模型的性能或是调整模型的功能
几种调用方式和对比如下:
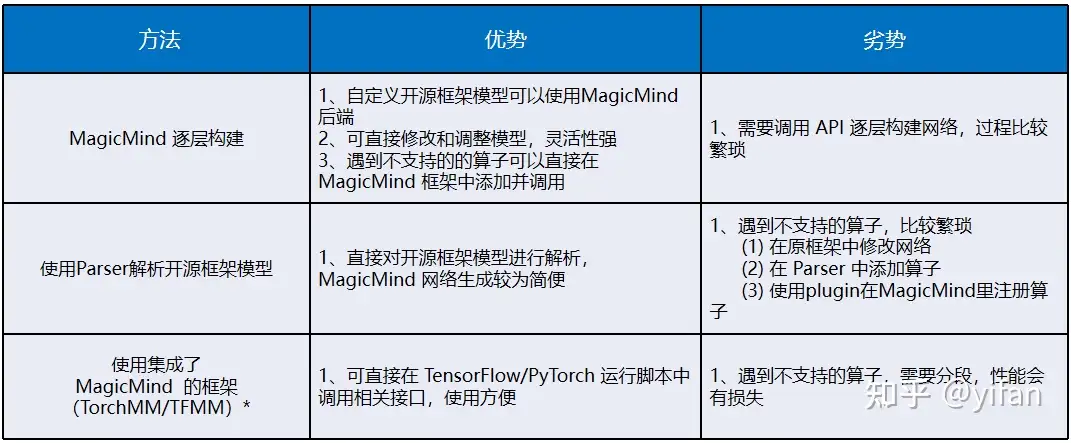
说明:TorchMM 或者 TFMM 在使用时相对前两个方法就比较方便,可以直接在 TensorFlow 或 PyTorch的运行脚本中调用相关接口,但是因为不支持的算子会先回退到 CNNL,如果 CNNL 不支持,再回退到cpu 运行,整个网络的运行速度相对于 MagicMind api 构建出来的网络会慢很多。
和上一个课时介绍的类似,只是这里介绍的是逐层构建。
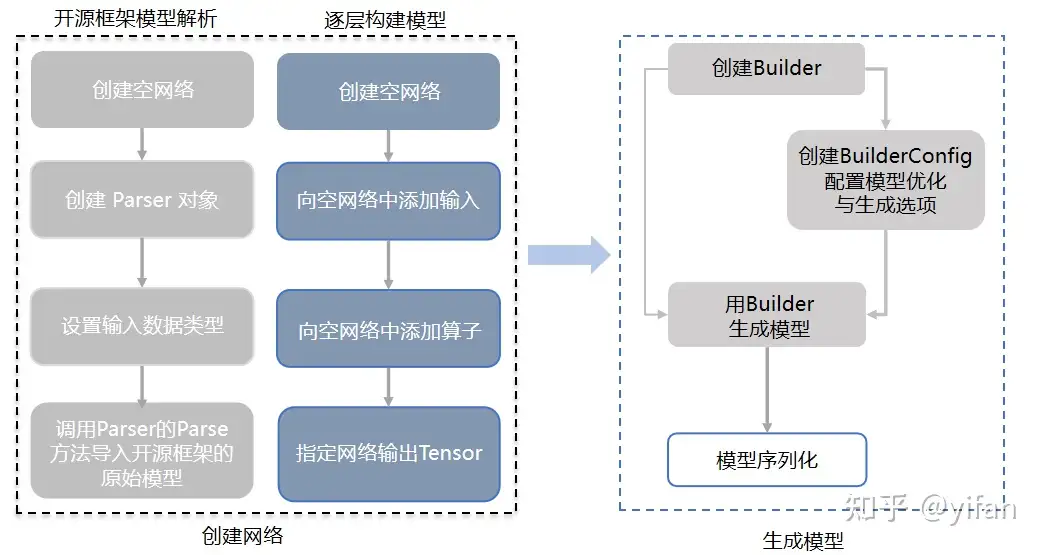
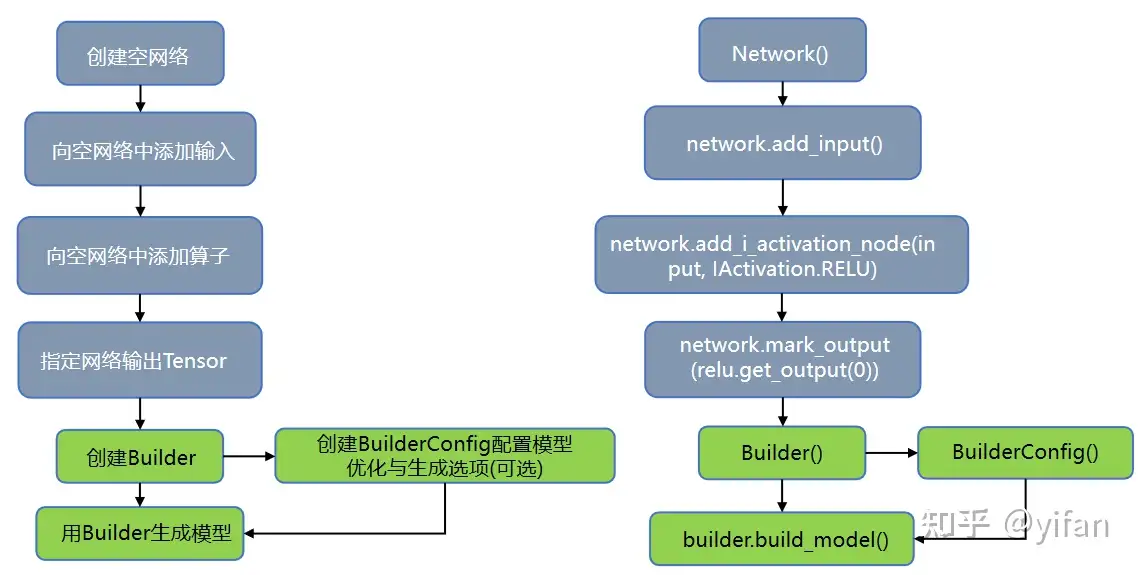
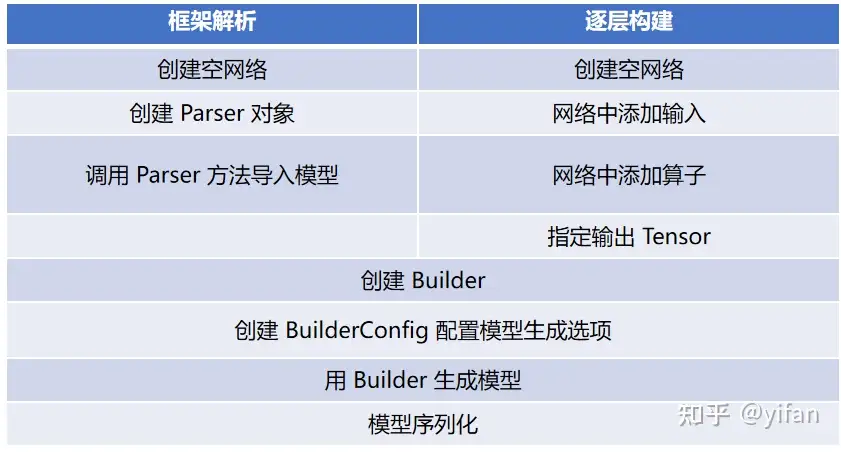
本节我们来介绍一下逐层构建 MagicMind 模型接口的调用,首先创建空网络,调用 Network() 对象,接下来向空网络中添加输入,调用 network 中的 add input 方法,接下来向空网络中添加算子,这里我们以激活算子 relu 为例调用 add i activation node 接口选择 iactivation relu 参数。然后调用 network 的mark output 指定网络的输出 tensor。创建完网络后,我们就可以创建并使用 builder 来生成模型。builderconfig 是可选的,当我们不使用 builderconfig 时,MagicMind 会以默认设置生成模型
使用conv,relu,max pool2d,reshape的顺序分别搭建了PyTorch模型和MagicMind模型
1)PyTorch搭建网络
class SampleNet(nn.Module):
    # network structure
    def __init__(self):
        super(SampleNet, self).__init__()
        self.conv1 = nn.Conv2d(1, 6, 5, padding=2)
        self.relu = nn.ReLU()
        self.max_pool2d = nn.MaxPool2d((2,2))
    def forward(self, x):
        conv_1 = self.conv1(x)
        relu_1 = self.relu(conv_1)
        max_pool2d_1 = self.max_pool2d(relu_1)
        x =  max_pool2d_1.view(-1,
        self.num_flat_features(max_pool2d_1))
        return x
    def num_flat_features(self, x):
        size = x.size()[1:]
        return np.prod(size)
2)以下脚本对应的MagicMind 逐层构建网络
network = Network()builder = Builder()input_tensor = network.add_input(DataType.FLOAT32, Dims([1,28,28,1]))weight_data1 = np.ones(shape=(6,5,5,1), dtype=np.float32)bias_data1 = np.zeros(shape=(6,), dtype=np.float32)weight1 = network.add_i_const_node(DataType.FLOAT32, Dims([6,5,5,1]), weight_data1)bias1 = network.add_i_const_node(DataType.FLOAT32, Dims([6]), bias_data1)conv1 = network.add_i_conv_node(input_tensor, weight1.get_output(0), bias1.get_output(0))assert conv1.set_stride(1, 1).ok()assert conv1.set_pad(2, 2, 2, 2).ok()assert conv1.set_dilation(1, 1).ok()relu1 = network.add_i_activation_node(conv1.get_output(0), IActivation.RELU)max_pool_2d1 = network.add_i_max_pool2d_node(relu1.get_output(0), False)num_flat_features = network.add_i_const_node(DataType.INT32,Dims([2]), [-1,1176])reshape = network.add_i_reshape_node(max_pool_2d1.get_output(0), num_flat_features.get_output(0))network.mark_output(reshape.get_output(0))
3)生成的对比结果:

对比结论:对于 PyTorch 模型解析和 逐层构建模型,图结构是一致的
两种方式的生成模型的操作是一样的,不同在于框架解析是对已有的开源框架模型解析并转换为 MMIR,逐层构建则是自己添加输入,算子,指定输出,MagicMind 对这个network 直接build。
代码来源于 MagicMind 发布包中的 /usr/lib/python3.7/site-packages/magicmind/python/samples/basic_samples,代码也下载到了本人仓库下,这里也粘贴出来。
sample_convrelu.py
import numpy.randomimport magicmind.python.runtime as mmdef construct_conv_relu_network(input_dim: mm.Dims,
                                filter_data: numpy.ndarray,
                                bias_data: numpy.ndarray,
                                stride: list,
                                pad: list,
                                dialation: list,
                                grapth_name="graph") -> mm.Model:
    main_type = mm.DataType.FLOAT32

    # Create builder and network
    builder = mm.Builder()
    network = mm.Network()

    # Set input tensor
    input_tensor = network.add_input(main_type, input_dim)

    # Create filter node
    filter = network.add_i_const_node(main_type, mm.Dims(filter_data.shape), filter_data)

    # Create bias node
    bias = network.add_i_const_node(main_type, mm.Dims(bias_data.shape), bias_data)

    # Create conv node
    conv = network.add_i_conv_node(input_tensor, filter.get_output(0), bias.get_output(0))
    assert conv.set_stride(stride[0], stride[1]).ok()
    assert conv.set_pad(pad[0], pad[1], pad[2], pad[3]).ok()
    assert conv.set_dilation(dialation[0], dialation[1]).ok()
    assert conv.set_padding_mode(mm.IPaddingMode.EXPLICIT).ok()

    # Create relu node
    relu = network.add_i_activation_node(conv.get_output(0), mm.IActivation.RELU)

    # Mark output to make network valid
    assert network.mark_output(relu.get_output(0))

    # Build and save model to local storage
    model = builder.build_model("conv_relu_model", network)
    assert model.serialize_to_file(grapth_name).ok()

    return modelif __name__ == "__main__":
    # Set params
    input_dim = mm.Dims([1, 224, 224, 3])
    filter_data = numpy.random.rand(256, 3, 3, 3)
    bias_data = numpy.random.rand(256)

    stride = [2, 2]
    pad = [0, 0, 0, 0]
    dilation = [1, 1]
运行:python sample_convrelu.py
将生成名为 graph 的 mm 文件。
说明:代码见 代码库的:cambricon_mlu_learning/15_magicmind/cn_mm3
相关链接
1. 在线课程:在线课程 – 寒武纪开发者社区 (cambricon.com)
2. 文档资料:文档中心 – 寒武纪开发者社区 (cambricon.com)
3. 代码库:https://gitee.com/yifanrensheng/cambricon_mlu_learningc
热门帖子
精华帖子


 Ashelly
13 回复
Ashelly
13 回复
 三叶虫
6 回复
三叶虫
6 回复
 fengyunkai
1 回复
fengyunkai
1 回复


 goodchong
 jyjyjyjyjy
 Github
 开发平台
开发平台 文档中心
文档中心 新手必读
新手必读